dimanche 23 mars 2014

Clone a Domain Controller in Windows Server 2012 with Hyper-V (VM-GenerationID)

Preamble : VM-GenerationID

One of the obvious reasons of virtualization is the independence of virtual machines with hardware. It is very simple to clone a Virtual Machine (VM) in a virtualized infrastructure.

But can we clone any VM?

It’s not easy to answer this question. The smart answer would be to say as often: "It depends".

Until the 2012 version of Windows Server, clone a VM hosting ADDS (Active Directory Domain Services) was forbidden. Indeed, clone or restore a Domain Controller, could certainly cause a "USN rollback".

One of the major benefits in Microsoft Windows 2012 Server version is the VM-GenerationID.

It’s an identifier encoded in 128 bits and provided by the hypervisor through a specific driver.

You can check inside a VM if you’ll be able to clone a Domain Controller. Let’s explore the device manager of a VM hosted by Hyper-V hypervisor running on a Windows 8 machine. Here you can see how this test lab was created.


If you see the device "Microsoft Hyper-V Generation Counter", your hypervisor will be able to manage the VM-GenerationID and thus you will be able to clone a Domain Controller.


The VM-GenerationID is generated and stored on the Domain Controller as an attribute of the Active Directory database. This attribute is not replicated.

The VM-GenerationID is recorded in the Active Directory database NTDS.dit as the attribute msDS-GenerationID.


You can see it by logging on the DC you want to check and display its attributes. You can easily do this via ADUC or ADAC.


1) Prerequisites 

Clone a DC should meet the following prerequisites:


  • As we have just seen, your hypervisor must support VM-GenerationID. This is the case with Hyper-V running on Windows 8 and on Windows Server 2012. 
  • The DC source must be running on Windows Server 2012 
  • The DC source can't hosted the PDC emulator role. In addition, the DC which hosts this role must be available and must be running on Windows Server 2012. 

Though, you must have at least two DCs in your infrastructure to begin cloning a DC.

2) Prepare the source DC

To clone a DC, you must first prepare it to be cloned. The first step is to add your source DC to the security group "Domain Controllers Cloneable". You have several options to do this.

The first through the ADAC or even ADUC.


The second way is to do it via powershell.


Add-ADGroupMember "Cloneable Domain Controllers" "CN=DC02,OU=Domain Controllers,DC=LABO,DC=COM"


Ok, our source DC is now a member of the security group "Domain Controllers Cloneable". We're going to continue to prepare it.

Technet tells us that we need to launch a first command before starting the cloning process. Indeed, we need to determine what programs and services are not present on the default supported list "DefaultDCCloneAllowList.xml" or a user-defined inclusion list named  "CustomDCCloneAllowList.xml" and thereby not supported by the cloning process because it have not been evaluated for cloning impact.


Get-ADDCCloningExcludedApplicationList


The result of the command is pretty clear in my case: "No excluded applications were detected". We can go further. However, in some cases you need to run a second command to generate your own .xml file containing the list of applications or services you want to add (because supported).

Here is an example (launched on a lab test running ESXi 5.1).


We type a second command to generate the .xml file.


Get-ADDCCloningExcludedApplicationList -GenerateXml


We can find the generated .xml file "CustomDCCloneAllowList.xml" in "C:\Windows\NTDS\".


To complete the warm-up, we have to launch a one last command:


New-ADDCCloneConfigFile -Static -IPv4Address "192.168.1.12" -IPv4DNSResolver "192.168.1.10" -IPv4SubnetMask "255.255.255.0" -CloneComputerName "DC03" -IPv4DefaultGateway "192.168.1.1" -SiteName "Default-First-Site-Name"


This command will generate a new .xml file: "DCCloneConfig.xml". By enter this command, we have specified the future cloned DC name and its network configuration.


The cloned DC must be on the same site.

Let's edit the configuration file of the DC02 virtual machine:


We find the number "genreration_id" with this hexadecimal value : "5683b796635a6015936e3117daa5b751".


The value for the msDS-GenerationId attribute is 51 B7 A5 DA 17 31 6E 93. By inverting the value found in the xml file of the virtual machine we find the same value 936e3117daa5b751 -> 51b7a5da17316e93


3) Export of the prepared VM and import in the new VM

Shut down the DC DC02 we just prepared.


In Hyper-V, select the VM to export (DC02 in this case) and choose the option "Export..."


Then, simply specify where you want to export your VM.


I've created, for this lab, a Export folder under the folder Labo on my G:\ disk which is, actually, a virtual disk hosted by a Synology NAS.


Let the export finished and then you get the tree Hyper-V created.


A .vhdx has been exported..


And the .xml configuration file.


Now, the import step. Select your node and "Import Virtual Machine...".


The import process is very simple "Next >"


"Browse".


Select the cloned VM root folder, here, for the example DC02. 


 "Next >".


Hyper-V detect a VM and  "Next >" ;-)


We want that Hyper-V create a new unique ID "Next >".


>Store the VM where you want "Next >"


Where you want to store the .vhdx.. "Next >"


It's finished! Check the review of the import and click on "Finish".


Hyper-V begins the importation process.


Once the import is complete, if you edit the .xml configuration file of the imported VM, you can observe that the generation_id field has been modified.

DC02 .xml


DC03 (imported VM) .xml


Rename the VM. Right click on the imported VM and click on "Rename..."


It's done ! Start DC02 and then DC03.


Starting of DC03...


The DC found out it was a clone, so it starts the cloning process.


DC03 restarts once.


Check the Sites and Services console. You can see the new DC.


And present also in ADUC and ADAC.


If the properties of DC03 (DC resulting from cloning) is edited, you can see that the VM-GenerationID is different from the source DC DC02.


4) Detailed cloning process

Technet explains exactly what happens during the cloning process. Here is the diagram published by Microsoft to explain it.


5) Cloning went wrong ?

In case your cloning is wrong, the source DC will restart in Directory Service Restore Mode (DSRM). You need to login locally and removed the flag for DSRM mode. Then cloning and restart after, obviously, correcting the error that prevented you to clone the source DC correctly. 

You can do this in two ways.

a) Via Msconfig


b) If you are in CORE Edition, via the command shell


bcdedit.exe /deletevalue safeboot


6) Conclusion

This tutorial is now complete.

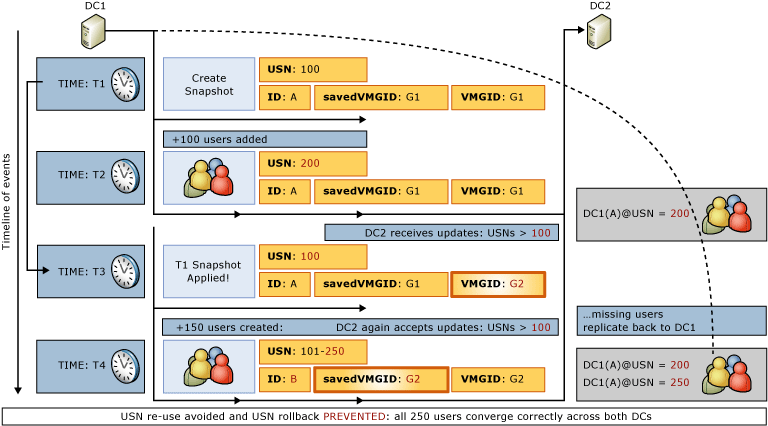
We can see the great interest of the VM-GenerationID addition by Microsoft. Yeah, because it also opens the way for snapshot DC.

Indeed, before this improvement, clone a DC could lead to serious inconsistencies in our AD database as shown in this diagram (source).


It is now managed as shown in the following scheme (source).


Windows Server 2012: Remove a corrupt/failed domain controller from Active Directory + FSMO seizing

Scenario

My test lab consists of 3 Domain Controller (DC): DC01, DC02, and DC03.

The scenario is as follows:

DC01 host the 5 Flexible Single Master Operations (FSMO) roles.

The DNS zone is integrated to Active Directory and is therefore stored in the application partition of our Active Directory database.

DC02 and DC03 are two Read and Write Domain Controller (RWDC).

DC01 failed and we can’t recovered it. No backup exists (:-/).

We will have to:

1) Perform the seizing of 5 FSMO roles.
2) Remove the DC from our Active Directory database.

1) Seizing FSMO roles

We connect to DC02 (this DC works properly, and we’ll seize the FSMO roles on it).

Once connected to DC02, launch a command prompt and enter the "ntdsutil" command.


Now, enter the "roles" command. The prompt now display "fsmo maintenance:".  At this point, you can query the system by typing the symbol "?" and enter to see all options available.

Firstly, you got all the seizing operations and secondly, the transfer operations. There is also the command "Connections" which helping us to connect to the DC02.


Let’s go, enter the "Connections" command.


The prompt waiting that whe indicate to which DC to connect. It says "server connections: _". We have to enter "connect to server DC02".


Ntdsutil is now connected to DC02. Enter "q" to quit the connection utility.


At this point, we can begin the seizing of the FSMO roles. Here are the commands to enter:

seize naming master
seize PDC
seize RID master
seize schema master
seize infrastructure master

Let’s begin by seizing the domain naming master role: "seize naming master". A message box dialog open to confirm the command you entered. Click on "Yes".


Here's what you will see at the prompt. Ntdsutil first attempts to transfer the role. It encounters an error (DC01 doesn’t exists anymore) and then began seizing the role. Nice.


You have to repeat this step with the other 4 FSMO roles to finally get all your roles seized.


For the more paranoid of us, you can still check DC02 holds the roles you just seized by entering the following command:

netdom query /domain:labo fsmo

You have to replace labo by your domain name.


Ok, that’s good. We can go further.


2) Remove the DC from our Active Directory database

According to Technet, there is no need to perform a metadata cleanup after the forced removal of a DC.
When you use Remote Server Administration Tools (RSAT) or the Active Directory Users and Computers console (Dsa.msc) that is included with Windows Server 2008 or Windows Server 2008 R2 to delete a domain controller computer account from the Domain Controllers organizational unit (OU), the cleanup of server metadata is performed automatically. Previously, you had to perform a separate metadata cleanup procedure.

We will check this to see if the DNS records are purged.

Before deleting our DC01, we can take the water a bit by checking some DNS records (SRV resources). We can see the records for our DC01.


I do not have a snapshot of all the records, but we have grasped the idea ;-)


DNS A et NS records, are also present.


According to Technet, we can use RSAT, ADUC, ADSS and ntdsutil to delete the failed DC. We chose ADUC. Find your failed DC, then right click > "Delete".


A first warning pop out. We can click on "Yes" button. We came specifically for that ;-)


A second warning pop out. It warn us about the fact we have to use dcpromo to remove a DC. Tick the checkbox "This Domain Controller is permanently offline and can no longer be demoted using the Active Directory Domain Services Installation Wizard (DCPROMO)".


Click on button "Delete".


In addition, it’s a global catalog DC. A new request for confirmation appears, click on "Yes".


Let's check the DNS again. Good news! Everything seems to be purged.


Here we have a NS record not removed, but let’s scavenging do its job.


The same here.


A check in ADSS console reveals the presence of DC01. I chose to remove it by clicking on "Delete" option. A dialog box appears. 


Answer by clicking "Yes".


Now, we have to check the replication (do it on DC03 too).


repadmin /showrepl


dcdiag /test:replications


dcdiag /test:netlogons


To complete audits I created an Organisational Unit (OU), on the DC02 and after replication, the OU is appeared on the DC03.

jeudi 6 mars 2014

VMWare/Powershell - Tirer des rapports de l'utilisation CPU/RAM/Disk/Network d'une machine virtuelle minute par minute et sans agrégation d'unité de temps

Bonjour à tous,

L'objectif de départ est de réaliser des mesures de l'activité de machines virtuelles hébergées sur une infrastructure à base d’hyperviseur ESXi à intervalle de temps d'une minute sur une période de 24h.

Le problème principal est que notre outil habituel de mesure, Veeam One, applique une agrégation des unités de temps pour maîtriser l'espace que sa base de données prend sur le disque ainsi que pour accélérer la génération des rapports et graphiques.

En effet, Veeam, malgré la configuration réalisée au niveau de l'hyperviseur VMWare même, applique ces règles :
  • Raw data (data with 20-second resolution) is stored for 1 hour.
  • After 1 hour, raw data is aggregated to 5-minute resolution data.
  • After 1 week, data with 5-minute resolution is aggregated to 2-hour resolution data. Data with this level of detail is stored in the database for up to 1 year.

Nous avons donc ouvert un ticket chez Veeam afin de déterminer avec eux s'il existait une possibilité de modifier ce comportement et de répondre, ainsi, à notre besoin. Voici le point central de leur réponse :
  • Veeam One Reporter is not able to send out reports with the discression of 1 minute
  • Veeam One Monitor does not send out reports

Bad news :-(

Let's go to script ^^

La première étape, si ce n'est déjà fait, est de télécharger VMware vSphere PowerCLI : 


Chargeons le snapin qui va nous permettre d'utiliser les cmdlets proposés par VMWare dans le cadre de tâches d'automatisation et de gestion de votre infrastructure virtualisée :
Add-PSSnapin VMware.VimAutomation.Core

Connectons-nous à notre VCenter :
Connect-VIServer –Server VotreServeurVcenter

Récupérons, par exemple les valeurs en pourcentage du CPU, minute par minute, de la journée d'hier :
$statCPU = Get-Stat -Entity $vmToQuery -Stat cpu.usage.average -Start $start -Finish $stop | where{$_.Instance -eq ""}

Vous pouvez également utiliser la version simplifiée qui fait la même chose :
$statCPU = Get-Stat -Entity $vmToQuery -CPU -Start $start -Finish $stop | where{$_.Instance -eq ""}

Nous obtenons donc un tableau comprenant toutes les valeurs du CPU en pourcentage minute par minute selon l’intervalle que vous avez défini.
Par exemple, pour la journée d’hier sur une période de 24h, voici ce que j’utilise dans le script comme valeur de début et de fin :
$start = (Get-Date -Hour 0 -Minute 0 -Second 0).AddDays(-1)
$stop = (Get-Date -Hour 23 -Minute 59 -Second 0).AddDays(-1)

L’idée est donc d’exploiter ce tableau pour générer un fichier Excel reprenant les valeurs en pourcentage ainsi que le timestamp de cette valeur. La seconde idée est de générer un graphique traçant les courbes selon ces données.

Pour réaliser des graphes, nous allons nous servir de l’excellente librairie proposée par .Net 3.5 ou supérieur : 
[void][Reflection.Assembly]::LoadWithPartialName("System.Windows.Forms.DataVisualization")

Et on commence par créer le chart et le chartarea :
$chart = new-object System.Windows.Forms.DataVisualization.Charting.Chart
$chartarea = new-object system.windows.forms.datavisualization.charting.chartarea

On donne les dimensions voulues :
$chart.width = 1500
$chart.Height = 600
$chart.Left = 40
$chart.top = 30

Gestion du titre qui sera present sur l’image :  
$titlefont=new-object system.drawing.font("ARIAL",12,[system.drawing.fontstyle]::bold)
$title =New-Object System.Windows.Forms.DataVisualization.Charting.title
$chart.titles.add($title)
$chart.titles[0].text = "CPU/Ram - " + $vmToQuery + " (" + $reportDate + ")"
$chart.titles[0].font = $titlefont
$chart.titles[0].forecolor = "Black"
$chart.Name = $vmToQuery
$chart.BackColor = [System.Drawing.Color]::White

Pour donner de la couleur au chartarea (N’hésitez pas à regarder la liste disponible ici ;-) http://msdn.microsoft.com/fr-fr/library/system.drawing.color_properties(v=vs.90).aspx) :
$chartarea.BackColor = [System.Drawing.Color]::FloralWhite

On ajoute le chartarea au chart : 
$chart.ChartAreas.Add($chartarea)

$legend = New-Object system.Windows.Forms.DataVisualization.Charting.Legend
$chart.Legends.Add($legend)

On positionne la légende de l’axe des X de manière vertical et selon un intervalle de 15 minutes (chaque point est dessiné selon une minute, mais la légende n’indique qu’un intervalle toutes les 1( minutes, pour garantir la lisibilité) : 
$chartarea.AxisX.LabelStyle.Angle = -90
$chartarea.AxisX.Interval = 15 

Les lignes suivantes vont nous permettre de gérer le tracé de la série que nous avons, rappelez-vous, dans notre tableau :
$chart.Series.Add("CPU")
$chart.Series["CPU"].ChartType = [System.Windows.Forms.DataVisualization.Charting.SeriesChartType]::Line
$chart.Series["CPU"].color = "blue"

Et voici la partie du code qui va nous permettre d’exploiter tout ce que nous venons de préparer précédemment. On parcourt notre tableau, pour ajouter son contenu à un objet de type psobject (http://msdn.microsoft.com/en-us/library/system.management.automation.psobject(v=vs.85).aspx)   
Ensuite, on transforme notre timestamp en un string acceptable pour la lisibilité et la lecture et on ajoute nos points les uns après les autres grâce à la ligne $chart.Series["CPU"].Points.AddXY($dtToString, $t.Value :

 foreach($t in $statCPU) {  
    $out = new-object psobject

    $out | Add-Member noteproperty timeStampCPU $t.Timestamp
    $out | Add-Member noteproperty valueCPU $t.Value
   
    $dtToString = $t.Timestamp
    [string]$dtToString = $dtToString -f "hh:mm"

    $chart.Series["CPU"].Points.AddXY($dtToString, $t.Value)

    $result += $out   

$chartarea.AxisY.Title = $unitCPU

$filename = $logFolder + "\" + $vmToQuery + "_" + $reportDate + ".png"
$chart.SaveImage($filename, "PNG")

L’export CSV (le paramètre –append nécessite Powershell v3.0) :
$result | Export-CSV -path $logFile –append –NoTypeInformation  

J’ai consolidé les informations d’utilisation de RAM et CPU sur le même graphique afin d’obtenir finalement ceci : 


J'ai réalisé la même chose pour l'utilisation des disques et du réseau.

$statRAM = Get-Stat -Entity $vmToQuery -Stat mem.usage.average -Start $start -Finish $stop
$statNetwork = Get-Stat -Entity $vmToQuery -Network -Start $start -Finish $stop
$statDisk = Get-Stat -Entity $vmToQuery -Disk -Start $start -Finish $stop  

Et après traitement, les résultats suivants :


Bon amusement :-)