1) Create volume on SAN
2) Follow these high-level steps to move a virtual machine to an alternate location (http://kb.vmware.com/selfservice/microsites/search.do?language=en_US&cmd=displayKC&externalId=1000936):
1.Select the virtual machine.
2.Commit all snapshots on the virtual machine. For more information, see Committing snapshots from within the Service Console (1006847).
3.Identify the working directory of the virtual machine.
4.Identify the location of all virtual disks.
5.Power off the virtual machine.
6.Create a folder for the copy of the virtual machine.
7.Copy the virtual machine configuration file (.vmx) to the new folder.
8.Copy the virtual disks to the new folder. For more information, see Moving or Copying Virtual Disks in a VMware Environment (900).
9.Register the new virtual machine.
10.Add the virtual disk copies to the virtual machine copy.
11.Upgrade the virtual hardware if necessary.
12.Power on the virtual machine.
13.Test the new virtual machine.
14.Optionally, delete the original virtual machine files.
Identifying the working directory
vmware-cmd -l
--> /vmfs/volumes/49bf8b5c-63674280-c015-00215xxxxx/VM_Local/VMx_Local.vmx
Identifying the location of all virtual disks
grep -i vmdk /vmfs/volumes/49bf8b5c-63674280-c015-00215xxxxx/VM_Local/VMx_Local.vmx
--> scsi0:0.fileName = "VM_Local.vmdk"
Creating a folder for the copy of the virtual machine
cd /vmfs/volumes/VM_DISK_C
mkdir VM_SAN
Clone VM
vmkfstools -i /vmfs/volumes/49bf8b5c-63674280-c015-00215xxxxx/VM_Local/IMCAS16_Local.vmdk /vmfs/volumes/VM_C/VM_SAN/VM_SAN.vmdk
Copying the virtual machine configuration file to the new folder
cp /vmfs/volumes/49bf8b5c-63674280-c015-00215xxxxx/VM_Local/VM_Local.vmx /vmfs/volumes/VM_DISK_C/VM_SAN/VM_SAN.vmx
Registering a virtual machine
To register a virtual machine from the ESX Service Console, run the command:
vmware-cmd /vmfs/volumes/4d54fe27-a09c1aa5-80a3-00215xxxxx/VM_SAN/VM_SAN.vmx register
vendredi 11 février 2011
Problem parsing database at line 875 - clamav ERROR: Malformed database on Ubuntu distribution
The problem
"Problem parsing database at line 875 "
"clamav ERROR: Malformed database"
And your clamav-daemon not started
The solution
--> Verify your distribution is up to date
sudo aptitude update
sudo aptitude safe-upgrade
sudo rm /var/lib/clamav/daily.cld
sudo freshclam
sudo /etc/init.d/clamav-daemon start
"Problem parsing database at line 875 "
"clamav ERROR: Malformed database"
And your clamav-daemon not started
The solution
--> Verify your distribution is up to date
sudo aptitude update
sudo aptitude safe-upgrade
sudo rm /var/lib/clamav/daily.cld
sudo freshclam
sudo /etc/init.d/clamav-daemon start
mercredi 2 février 2011
Auto Accept Agent Installation and configuration - Meeting Room auto accept or deny scheduling
Goal : Manage auto accept request for meeting room in Outlook.
First of all, you have to create a resource for the meeting room. So create a normal user with an email (by example : meetingroom1@test.com).
Download the tool AutoAccept.EXE (Resource kit Exchange Server 2003)
http://www.microsoft.com/downloads/en/details.aspx?familyid=3d0884e6-c603-491d-bf57-acf03e046bfe&displaylang=en
To Install Auto Accept Agent
1. On the download page at http://go.microsoft.com/fwlink/?linkid=28650, double-click Download to open the Windows Installer Package (AUTOACCEPT.MSI). Follow the instructions on the screen.
2. In the Auto Accept Agent Installation Wizard, click Next on the Welcome page.
3. On the End User License page, read the license agreement. If you agree to the terms, click I agree and then click Next.
4. The default directory in which Auto Accept Agent installs is \Exchsrvr\Agents\AutoAccept. You can change this default. Click Next. Auto Accept Agent installs.
5. Select Run as Local System (available only if you are running Microsoft Windows Server 2003) or This user. If you select This user, specify the credentials for Auto Accept Agent by providing the username under which Auto Accept Agent will run, the password for this account, and the domain for this account. Click OK.
Edit C:\Program Files\Exchsrvr\Agents\AutoAccept\AutoAccept.config.xml
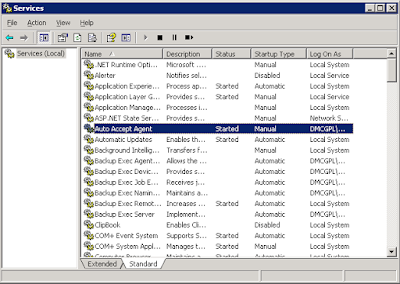
Restart service
Create a file.txt with emails you want to add
Then in a command shell
cscript RegisterMailbox.vbs /f:file.txt /t:domain\username
First of all, you have to create a resource for the meeting room. So create a normal user with an email (by example : meetingroom1@test.com).
Download the tool AutoAccept.EXE (Resource kit Exchange Server 2003)
http://www.microsoft.com/downloads/en/details.aspx?familyid=3d0884e6-c603-491d-bf57-acf03e046bfe&displaylang=en
To Install Auto Accept Agent
1. On the download page at http://go.microsoft.com/fwlink/?linkid=28650, double-click Download to open the Windows Installer Package (AUTOACCEPT.MSI). Follow the instructions on the screen.
2. In the Auto Accept Agent Installation Wizard, click Next on the Welcome page.
3. On the End User License page, read the license agreement. If you agree to the terms, click I agree and then click Next.
4. The default directory in which Auto Accept Agent installs is \Exchsrvr\Agents\AutoAccept. You can change this default. Click Next. Auto Accept Agent installs.
5. Select Run as Local System (available only if you are running Microsoft Windows Server 2003) or This user. If you select This user, specify the credentials for Auto Accept Agent by providing the username under which Auto Accept Agent will run, the password for this account, and the domain for this account. Click OK.
Edit C:\Program Files\Exchsrvr\Agents\AutoAccept\AutoAccept.config.xml
<?xml version="1.0" encoding="utf-8" ?>
- <Configuration xmlns:xsd="http://www.w3.org/2001/XMLSchema" xmlns:xsi="http://www.w3.org/2001/XMLSchema-instance" xmlns="urn:microsoft.exchange.agents.autoaccept.config" xsi:schemaLocation="urn:microsoft.exchange.agents.autoaccept.config AutoAccept.config.xsd">
- <GlobalSettings>
<BookingWindowInMonths>12</BookingWindowInMonths>
<DeleteAttachments>true</DeleteAttachments>
<DeleteComments>true</DeleteComments>
<DeleteNonCalendarItems>true</DeleteNonCalendarItems>
<DisableReminders>true</DisableReminders>
<EnforceRecurringMeetingEndDate>true</EnforceRecurringMeetingEndDate>
<RecurringMeetingConflictPercentageAllowed>0</RecurringMeetingConflictPercentageAllowed>
<RecurringMeetingMaximumConflictInstances>0</RecurringMeetingMaximumConflictInstances>
<RemovePrivateProperty>true</RemovePrivateProperty>
<TraceLevel>0</TraceLevel>
<TraceListenerFile>c:\temp\log.txt</TraceListenerFile>
<TraceToEventLog>false</TraceToEventLog>
<EnableResponseDetails>true</EnableResponseDetails>
<IncludeDebugInResponse>true</IncludeDebugInResponse>
<CustomResponseText />
</GlobalSettings>
- <Mailbox EMailAddress="meetingroom1@test.com">
- <Settings>
<BookingWindowInMonths>12</BookingWindowInMonths>
<DeleteAttachments>true</DeleteAttachments>
<DeleteNonCalendarItems>true</DeleteNonCalendarItems>
<DisableReminders>true</DisableReminders>
<RecurringMeetingConflictPercentageAllowed>25</RecurringMeetingConflictPercentageAllowed>
<RecurringMeetingMaximumConflictInstances>4</RecurringMeetingMaximumConflictInstances>
<TraceLevel>0</TraceLevel>
</Settings>
</Mailbox>
- <Mailbox EMailAddress="meetingroom2@test.com">
- <Settings>
<BookingWindowInMonths>12</BookingWindowInMonths>
<DeleteAttachments>true</DeleteAttachments>
<DeleteNonCalendarItems>true</DeleteNonCalendarItems>
<DisableReminders>true</DisableReminders>
<RecurringMeetingConflictPercentageAllowed>25</RecurringMeetingConflictPercentageAllowed>
<RecurringMeetingMaximumConflictInstances>4</RecurringMeetingMaximumConflictInstances>
<TraceLevel>0</TraceLevel>
</Settings>
</Mailbox>
</Configuration>
Restart service
Create a file.txt with emails you want to add
meetingroom1@test.com
meetingroom2@test.com
Then in a command shell
cscript RegisterMailbox.vbs /f:file.txt /t:domain\username
Inscription à :
Articles (Atom)