Affichage des articles dont le libellé est Domain AD. Afficher tous les articles

vendredi 31 juillet 2015

How to reveal Windows 10 password ?

Disclaimer
Any actions and or activities related to the material contained within this blog is solely your responsibility.The misuse of the information in this website can result in criminal charges brought against the persons in question. The authors will not be held responsible in the event any criminal charges be brought against any individuals misusing the information in this website to break the law.
This script is published for educational use only. I am no way responsible for any misuse of the information.
This article is related to Computer Security and I am not promote hacking / cracking / software piracy.
This article is not a GUIDE of Hacking. It is only provide information about the legal ways of retrieving the passwords. You shall not misuse the information to gain unauthorised access. However you may try out these hacks on your own computer at your own risk. Performing hack attempts (without permission) on computers that you do not own is illegal.

Reveal the password of Windows 10 Home edition and PRO edition and Windows 10 Enterprise edition

If you read my previous entry on "How to reveal Windows password ?", you are aware that my tool can reveal local or domain password regardless of the difference in architecture of the machine targeted.

I just try my RWMC tool on a fresh install of Windows 10 Home edition and Windows 10 PRO edition and Windows 10 Enterprise edition, it works like a charm ;-)

1) First, add this registry key UseLogonCredential (DWORD to set to 1) in HKLM\SYSTEM\CurrentControlSet\Control\SecurityProviders\WDigest and then reboot **The script does the job now**

2) You can use the 2r2 mode to reveal password from the Windows memory as you can do it on a Windows 2012R2 **Just enter "local" and the script does the job**


The result


Enjoy !

dimanche 19 avril 2015

I am a Technet Guru :-)

Hello everyone,

I would like to share with you my gold medal from the Microsoft TechNet Guru Awards! I got it with my Active Directory article about cloning a Domain Controler.

Guru Award Windows Server Technical Guru - March 2015  
Gold Award WinnerPierre-Alexandre BraekenActive Directory - Clone a Domain Controller in Windows Server 2012 with Hyper-V (VM-GenerationID)Mark Parris: "The principals of cloning a DC."
JM: "This is an excellent article on cloning a DC, nice work and thanks for the contribution."
Richard Mueller: "Excellent topic and great images."

http://blogs.technet.com/b/wikininjas/archive/2015/04/17/the-microsoft-technet-guru-awards-march-2015.aspx

vendredi 3 avril 2015

Fonctionnement de Kerberos sous Windows


Processus de log on pour l’utilisateur U

La première opération de l’utilisateur U est le logon dans le domaine. À travers une séquence spéciale, appelée SAS (Secure Attention Sequence) bien connue sous la séquence CTRL+ALT+DELETE, l’utilisateur U encode ses credentials (username et password ou SmartCard) à travers LogonUI. Ces credentials sont envoyés à LSASS (Local Security Authority Subsystem) qui utilise la fonction lsalookupauthenticationpackage pour déterminer quel provider utiliser. Ensuite, les credentials sont passés au provider grâce à la fonction LsaLogonUser.

Cas où le process est abandonné :

  • Credentials incorrects
  • Le provider indiqué n’est pas trouvé
  • La méthode de logon n’est pas acceptée (interractive logon, network, batch, service)

Le provider Kerberos entre dans un processus que nous expliquons en 6 étapes :

Version simple du fonctionnement de Kerberos

L’utilisateur U veut accéder à une ressource R sur le serveur S intégré au domaine D

1) Le client U, à travers Kerberos, contacte le KDC (Key Distribution Center) afin d’obtenir un TGT (Ticket Granting Ticket) en donnant son identité, le service name (dans le cas de AS_REQ, c’est toujours le service krbtgt) et un timestamp encrypté avec son secret (dérivé du password ou long-term-key). Ce timestamp (ainsi que d’autres données, comme l’ip et le lifetime) est en fait un authenticator qui permet de prouver au KDC que U est bien U.

2) KDC décrypte le message avec le secret partagé avec U (vérification dans sa base), vérifie la valeur du timestamp proposé (refuse si la différence entre le timestamp et son heure est de plus de 5 minutes (par défaut ou que le timestamp est plus petit ou égal au timestamp du précédent authenticator). Ensuite le service d’authentification crée une clé de session de logon (nécessaire pour s’adresser au TGS) qu’il crypte avec le secret partagé. Il crée alors le TGT qui inclut les informations de l’utilisateur (dont le user RID et les group memberships), le lifetime et la clé de session de logon cryptée. Enfin, il crypte le TGT avec son propre secret (password du compte krbtgt) et envoi à U le TGT et la clé de session de logon cryptée. Le TGT peut seulement être décrypté par un KDC valide ! Un RODC a son propre compte krbtgt avec un password propre. Ce qui veut dire qu’un utilisateur présentant un TGT provenant d’un RODC à un RWDC, le RWDC dump le TGT et en génère un nouveau.

3) Le client reçoit deux messages, le TGT et la clé de session de logon. Le client décrypte la clé de session avec son secret et le met en cache. En plus de ceci, le client stocke également le TGT dans son cache (klist permet d’afficher les tickets mis en cache). Dès lors que le client veut accéder à un service sur le réseau, il fait une demande au service Ticket-Granting-Service du KDC. Sa demande contient un authenticator encrypté avec la clé de session de logon et composé du username et d’un timestamp, le nom du service qu’il veut joindre (Service Principal Name*) et le TGT.

4) Le KDC reçoit la demande de ticket de service. Il la traite complètement seulement si le SPN est unique et le timestamp est dans le range acceptable et le TGT est valide et non expiré. Le Ticket-Granting-Service décrypte le TGT avec son secret (password de krbtgt) et extrait la clé de session de logon. Cette clé de session lui permet donc de décrypter l’authenticator. S’il y parvient avec succès, il extrait du TGT les informations de l’utilisateur. Ensuite, le TGS crée une clé de session de service.

Le TGS crée deux messages:

  • un message contenant le SPN, le timestamp récupéré après avoir décrypté l’authenticator et la clé de session de service à Ce message est encrypté avec la clé de session de logon
  • le Ticket de service contenant le username U, le SPN, la clé de session de service et le timestamp à ce message est encrypté avec le secret du service (long term key du server sur lequel réside le service)

5) Le client U envoie le ticket de service par une requête au serveur S. La requête contient l’authenticator (time stamp et username), qui est encrypté avec la clé de session de service et le ticket de service.

6) Le serveur reçoit la requête et décrypte le ticket de service en utilisant son secret et extrait la clé de session de service. Ensuite il utilise la clé de session de service pour décrypter l’authenticator et pour l’évaluer. Si le test est OK, le serveur encrypte l’authenticator avec la clé de session de service et renvoie l’authenticator au client. Le client décrypte l’authenticator, récupère le timestamp, et s’il s’agit du même que l’original, c’est bon la connexion s’opère, le client a accès au service demandé.

Les packets sont constitués comme suit :


*Que sont les Principal Names ?

User Principal Name (UPN)
Doit être unique au sein d’une forêt. Il s’agit d’un attribut d’un objet Active Directory. Il ne peut contenir qu’une seule valeur (exemple: bob@contoso.com)

Service Principal Name (SPN)
Doit être unique au sein d’une forêt. Il est défini au niveau du contexte de sécurité du compte pour lequel il tourne. Il est du type Service/hostname (on peut également spécifier un numéro de port). Le SPN est très important dans un domaine Active Directory. En effet, c’est grâce à lui que tous les services possibles dans un réseau Active Directory sont accédés. Ils doivent être uniques pour un type de service car sinon, KDC est dans l’impossibilité de déterminer quel host héberge le service.

vendredi 11 juillet 2014

Get remote information of a server in Powershell ("Computer Name","Operating System","Manufacturer","Model","RAM","CPU","IPV4","diskData") Get-ADComputerDetails

Hi !

Your manager wants to know informations about servers joined to the company's Active Directory and you want to retrieve informations with Powerhsell ?

Let's get started !

This script will retrieve servers informations in a CSV file like this :

"Computer Name","Operating System","Manufacturer","Model","RAM","CPU","IPV4","diskData"
"VirtualServer","Windows Server 2008 R2 Standard","VMware, Inc.","VMware Virtual Platform","8 GB","2","10.193.17.42","C: 14.47 GB / 39.9 GB - D: 23.48 GB / 100 GB"
"PhysicalServer","Windows Server 2008 R2 Standard","IBM","IBM System x3550 M4 Server -[***43*G]-","32 GB","1","10.193.17.217","C: 33.36 GB / 100 GB - D: 373.54 GB / 456.61 GB"

$ADComputerProperties = @(`
"Operatingsystem",
"OperatingSystemServicePack",
"Created",
"Enabled",
"LastLogonDate",
"IPv4Address",
"CanonicalName"
)

$SelectADComputerProperties = @(`
"Name",
"OperatingSystem",
"OperatingSystemServicePack",
"Created",
"Enabled",
"LastLogonDate",
"IPv4Address",
"CanonicalName"
)

$servers = Get-ADComputer -Filter * -SearchBase "ou=servers,ou=IT resources,DC=ad,DC=dieteren,DC=be" -Properties $ADComputerProperties | select $SelectADComputerProperties
Foreach ($server in $servers)
{
    $hostName = $server.Name
    $operatingSystem = $server.OperatingSystem
    $serverInfo = (Get-WmiObject -Computername $hostName Win32_ComputerSystem)
    $manufacturer = $serverInfo.Manufacturer
    $model = $serverInfo.Model
    $displayGB = [math]::round($serverInfo.TotalPhysicalMemory/1024/1024/1024, 0)
    $ipv4 = $server.IPv4Address
    $serverDiskInfo = (Get-WmiObject -Computername $server.Name win32_logicaldisk -Filter "drivetype='3'")

    $cpu = @(Get-WmiObject -Class Win32_processor -Computername $hostName)
    $c_socket = $cpu.count
    $c_core = $cpu[0].NumberOfCores * $c_socket
    $c_logical = $cpu[0].NumberOfLogicalProcessors * $c_socket
  
    $psobject = New-Object -TypeName psObject -Property ([ordered]@{
        'Computer Name' = $hostName
        'Operating System' = $operatingSystem
        'Manufacturer' = $manufacturer
        'Model' = $model
        'RAM' = "$displayGB GB"
        'CPU' = $c_socket
        'IPV4' = $ipv4
    })

    $psobject | Add-Member -type NoteProperty -name diskData -Value NotSet
   
    $i=0
    Foreach ($disk in $serverDiskInfo) {       
        $diskSize = [math]::Round($disk.size / 1gb,2)
        $diskFreeSpace = [math]::Round($disk.freespace / gb,2)                               
        Write-Host "$($disk.deviceid) $diskFreeSpace GB / $diskSize GB"      
        if($i -eq 0) {
            $psobject.diskData = "$($disk.deviceid) $diskFreeSpace GB / $diskSize GB"
        }
        else {
            $psobject.diskData += " - $($disk.deviceid) $diskFreeSpace GB / $diskSize GB"
        }
        $i++
    }     
    
   
    $psobject | Export-Csv C:\ComputerDetails.csv -Append 
}


lundi 16 juin 2014

Microsoft DFS-R problem : The sysvol permissions for one or more GPOs on this domain controller are not in sync with the permissions for the GPOs on the baseline domain

Hello,
Recently, I encountered a Distributed File System Replication problem in our Active Directory.
Notice : pay attention that the AD replication and Sysvol replication are two very different things. Indeed, the replication of Sysvol is done wit DFS mechanism which replaced FRS since 2008.
In windows 2012r2, through the new Group Policy Management, when I click on "Detect Now", results show ACLs not in sync with the baseline domain...


The sysvol permissions for one or more GPOs on this domain controller are not in sync with the permissions for the GPOs on the baseline domain

First thing, the level of the domain and forest functionnal level is 2008r2.

I check first the DFS Replication with tools provided by Microsoft in the DFS Management Console on the baseline DC (Health Report, Propagation test et Propagation report). The result was ok...
You can use dfsrdiag to check DFS-R operations.
dfsrdiag.exe syncnow /rgname:“domain system volume” /partner:yourBaselineDC /time:1 /verbose

Steps to solve the problem :

1. DNS check on all DCs (the first DNS server must be the DC itself)
2. Resume replication on volume c:\ on the baseline DC
Get the volumeGuid
GWMI -namespace root\cimv2 -class win32_volume | FL -property DriveLetter, DeviceID
Resume replication on volume
wmic /namespace:\\root\microsoftdfs path dfsrVolumeConfig where 'volumeGuid="ce3fb9d1-6ecf-447e-b99c-6e451cab8012"' call ResumeReplication
3. Force the authoritative synchronisation for the DFSR-replicated SYSVOL (was the "D4" when we used FRS in the past) from the PDC Emulator (http://support.microsoft.com/kb/2218556)
a)
Get-ADObject "CN=SYSVOL Subscription,CN=Domain System Volume,CN=DFSR-LocalSettings,CN=YourPDCEmulation,OU=Domain Controllers,DC=domain,DC=com" -properties * 
b) 
Set-ADObject "CN=SYSVOL Subscription,CN=Domain System Volume,CN=DFSR-LocalSettings,CN=YourPDCEmulation,OU=Domain Controllers,DC=domain,DC=com" -Replace @{"msDFSR-Enabled"="FALSE";"msDFSR-Options"=1} 
c) On all other DCs
Set-ADObject "CN=SYSVOL Subscription,CN=Domain System Volume,CN=DFSR-LocalSettings,CN=DCx,OU=Domain Controllers,domain,DC=com" -Replace @{"msDFSR-Enabled"="FALSE"} 
d) repadmin /syncall /AdeP
e) Start of the DFSR service on the PDC Emulator.
f) On the PDC Emulator :
Set-ADObject "CN=SYSVOL Subscription,CN=Domain System Volume,CN=DFSR-LocalSettings,CN=YourPDCEmulation,OU=Domain Controllers,DC=domain,DC=com" -Replace @{"msDFSR-Enabled"="TRUE"} 
g) repadmin /syncall /AdeP
h) From the PDC Emulator in an elevated command prompt : DFSRDIAG POLLAD
i)  Start of the DFSR service on all other DCs
j) On all other DCs  :
Set-ADObject "CN=SYSVOL Subscription,CN=Domain System Volume,CN=DFSR-LocalSettings,CN=DCx,OU=Domain Controllers,domain,DC=com" -Replace @{"msDFSR-Enabled"="TRUE"} 
k) On all other non-authoritative DCs  in an elevated command prompt : DFSRDIAG POLLAD
4) Then reset permissions of all listed GPOs 
In Group Policy Management Console, click on a GPO>delegation tab>Advanced>Advanced>Restore Defaults (or make a script to restore defaults permissions and to keep custom permissions.


Note :

Remember that it's recommended to edit your GPOs from the PDC Emulator. The PDC Emulator is the prefered admistration entry point for services like GPOs and DFS.

When using Remote Server Administration Tools, you can choose the domain controlter to use.

In Administrative Users and Computers console>right click on your domain>change domain controller


Then choose the DC to use. 


dimanche 23 mars 2014

Clone a Domain Controller in Windows Server 2012 with Hyper-V (VM-GenerationID)

Preamble : VM-GenerationID

One of the obvious reasons of virtualization is the independence of virtual machines with hardware. It is very simple to clone a Virtual Machine (VM) in a virtualized infrastructure.

But can we clone any VM?

It’s not easy to answer this question. The smart answer would be to say as often: "It depends".

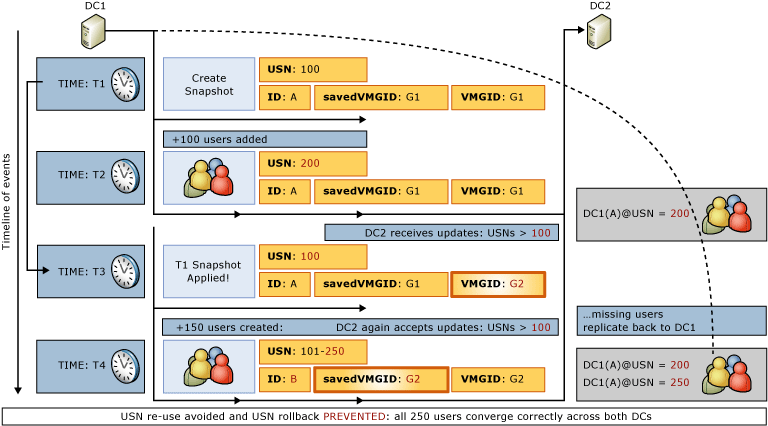
Until the 2012 version of Windows Server, clone a VM hosting ADDS (Active Directory Domain Services) was forbidden. Indeed, clone or restore a Domain Controller, could certainly cause a "USN rollback".

One of the major benefits in Microsoft Windows 2012 Server version is the VM-GenerationID.

It’s an identifier encoded in 128 bits and provided by the hypervisor through a specific driver.

You can check inside a VM if you’ll be able to clone a Domain Controller. Let’s explore the device manager of a VM hosted by Hyper-V hypervisor running on a Windows 8 machine. Here you can see how this test lab was created.


If you see the device "Microsoft Hyper-V Generation Counter", your hypervisor will be able to manage the VM-GenerationID and thus you will be able to clone a Domain Controller.


The VM-GenerationID is generated and stored on the Domain Controller as an attribute of the Active Directory database. This attribute is not replicated.

The VM-GenerationID is recorded in the Active Directory database NTDS.dit as the attribute msDS-GenerationID.


You can see it by logging on the DC you want to check and display its attributes. You can easily do this via ADUC or ADAC.


1) Prerequisites 

Clone a DC should meet the following prerequisites:


  • As we have just seen, your hypervisor must support VM-GenerationID. This is the case with Hyper-V running on Windows 8 and on Windows Server 2012. 
  • The DC source must be running on Windows Server 2012 
  • The DC source can't hosted the PDC emulator role. In addition, the DC which hosts this role must be available and must be running on Windows Server 2012. 

Though, you must have at least two DCs in your infrastructure to begin cloning a DC.

2) Prepare the source DC

To clone a DC, you must first prepare it to be cloned. The first step is to add your source DC to the security group "Domain Controllers Cloneable". You have several options to do this.

The first through the ADAC or even ADUC.


The second way is to do it via powershell.


Add-ADGroupMember "Cloneable Domain Controllers" "CN=DC02,OU=Domain Controllers,DC=LABO,DC=COM"


Ok, our source DC is now a member of the security group "Domain Controllers Cloneable". We're going to continue to prepare it.

Technet tells us that we need to launch a first command before starting the cloning process. Indeed, we need to determine what programs and services are not present on the default supported list "DefaultDCCloneAllowList.xml" or a user-defined inclusion list named  "CustomDCCloneAllowList.xml" and thereby not supported by the cloning process because it have not been evaluated for cloning impact.


Get-ADDCCloningExcludedApplicationList


The result of the command is pretty clear in my case: "No excluded applications were detected". We can go further. However, in some cases you need to run a second command to generate your own .xml file containing the list of applications or services you want to add (because supported).

Here is an example (launched on a lab test running ESXi 5.1).


We type a second command to generate the .xml file.


Get-ADDCCloningExcludedApplicationList -GenerateXml


We can find the generated .xml file "CustomDCCloneAllowList.xml" in "C:\Windows\NTDS\".


To complete the warm-up, we have to launch a one last command:


New-ADDCCloneConfigFile -Static -IPv4Address "192.168.1.12" -IPv4DNSResolver "192.168.1.10" -IPv4SubnetMask "255.255.255.0" -CloneComputerName "DC03" -IPv4DefaultGateway "192.168.1.1" -SiteName "Default-First-Site-Name"


This command will generate a new .xml file: "DCCloneConfig.xml". By enter this command, we have specified the future cloned DC name and its network configuration.


The cloned DC must be on the same site.

Let's edit the configuration file of the DC02 virtual machine:


We find the number "genreration_id" with this hexadecimal value : "5683b796635a6015936e3117daa5b751".


The value for the msDS-GenerationId attribute is 51 B7 A5 DA 17 31 6E 93. By inverting the value found in the xml file of the virtual machine we find the same value 936e3117daa5b751 -> 51b7a5da17316e93


3) Export of the prepared VM and import in the new VM

Shut down the DC DC02 we just prepared.


In Hyper-V, select the VM to export (DC02 in this case) and choose the option "Export..."


Then, simply specify where you want to export your VM.


I've created, for this lab, a Export folder under the folder Labo on my G:\ disk which is, actually, a virtual disk hosted by a Synology NAS.


Let the export finished and then you get the tree Hyper-V created.


A .vhdx has been exported..


And the .xml configuration file.


Now, the import step. Select your node and "Import Virtual Machine...".


The import process is very simple "Next >"


"Browse".


Select the cloned VM root folder, here, for the example DC02. 


 "Next >".


Hyper-V detect a VM and  "Next >" ;-)


We want that Hyper-V create a new unique ID "Next >".


>Store the VM where you want "Next >"


Where you want to store the .vhdx.. "Next >"


It's finished! Check the review of the import and click on "Finish".


Hyper-V begins the importation process.


Once the import is complete, if you edit the .xml configuration file of the imported VM, you can observe that the generation_id field has been modified.

DC02 .xml


DC03 (imported VM) .xml


Rename the VM. Right click on the imported VM and click on "Rename..."


It's done ! Start DC02 and then DC03.


Starting of DC03...


The DC found out it was a clone, so it starts the cloning process.


DC03 restarts once.


Check the Sites and Services console. You can see the new DC.


And present also in ADUC and ADAC.


If the properties of DC03 (DC resulting from cloning) is edited, you can see that the VM-GenerationID is different from the source DC DC02.


4) Detailed cloning process

Technet explains exactly what happens during the cloning process. Here is the diagram published by Microsoft to explain it.


5) Cloning went wrong ?

In case your cloning is wrong, the source DC will restart in Directory Service Restore Mode (DSRM). You need to login locally and removed the flag for DSRM mode. Then cloning and restart after, obviously, correcting the error that prevented you to clone the source DC correctly. 

You can do this in two ways.

a) Via Msconfig


b) If you are in CORE Edition, via the command shell


bcdedit.exe /deletevalue safeboot


6) Conclusion

This tutorial is now complete.

We can see the great interest of the VM-GenerationID addition by Microsoft. Yeah, because it also opens the way for snapshot DC.

Indeed, before this improvement, clone a DC could lead to serious inconsistencies in our AD database as shown in this diagram (source).


It is now managed as shown in the following scheme (source).