Affichage des articles dont le libellé est Exchange. Afficher tous les articles

mardi 29 janvier 2013

Comment déléguer la gestion d'une liste de distribution dans Exchange 2010 ?

Préambule : le modèle de permissions RBAC d'Exchange 2010

Si vous désirez donner la possibilité à vos utilisateurs finaux de gérer leurs listes de distribution, il faut d'abord que vous sachiez que la manière de faire ça dans Exchange 2010 est complètement différente que dans les versions précédentes d'Exchange.

En effet, le modèle de permissions dans Exchange 2010 est basé sur le RBAC (Role Based Access Control). Ceci permet la gestion très fine des permissions. L'intérêt sera évidemment de déléguer des tâches très précises à des utilisateurs à différents niveaux dans l'entreprise.


Le modèle RBAC appliqué à la délégation de gestion d'une liste de distribution

Imaginons qu'un département a besoin de gérer une liste de distribution fréquemment mise à jour. Il est peu intéressant de laisser cette tâche entre les mains d'un administrateur de messagerie Exchange ou même des membres du helpdesk de votre entreprise.

On veut donc donner la possibilité au gestionnaire de cette liste de distribution le droit d'ajouter et de retirer des membres de cette liste.


1) Donner le droit de gestion de la liste à votre utilisateur

Ceci peut se faire via l'ADUC, l'ADAC, mais également via la console EMC (Exchange Management Console).

Nous allons réaliser l'opération via cette dernière.

Recipient Configuration > Distribution Group > 'Votre liste de distribution" > Properties


Cliquez sur l'onglet Group Information et ensuite il vous suffit d'ajouter l'utilisateur gestionnaire de cette liste de distribution.
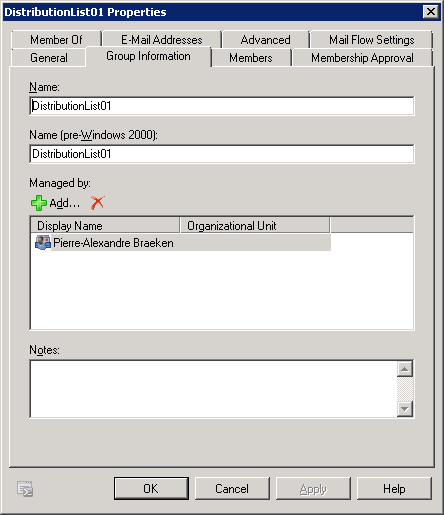

Via Powershell


Set-DistributionGroup -Identity "DistributionList01" –ManagedBy "Pierre-Alexandre Braeken" -BypassSecurityGroupManagerCheck


2) Le rôle de gestion MyDistributionGroups n'est pas suffisamment granulaire

Rendons-nous sur notre console ECP (Exchange Control Panel) afin de définir un rôle de gestion dont l'objectif est la gestion des membres de la liste de distribution dont notre utilisateur est responsable.


ECP > Role & Auditing > Default Role Assignment Policy > Details
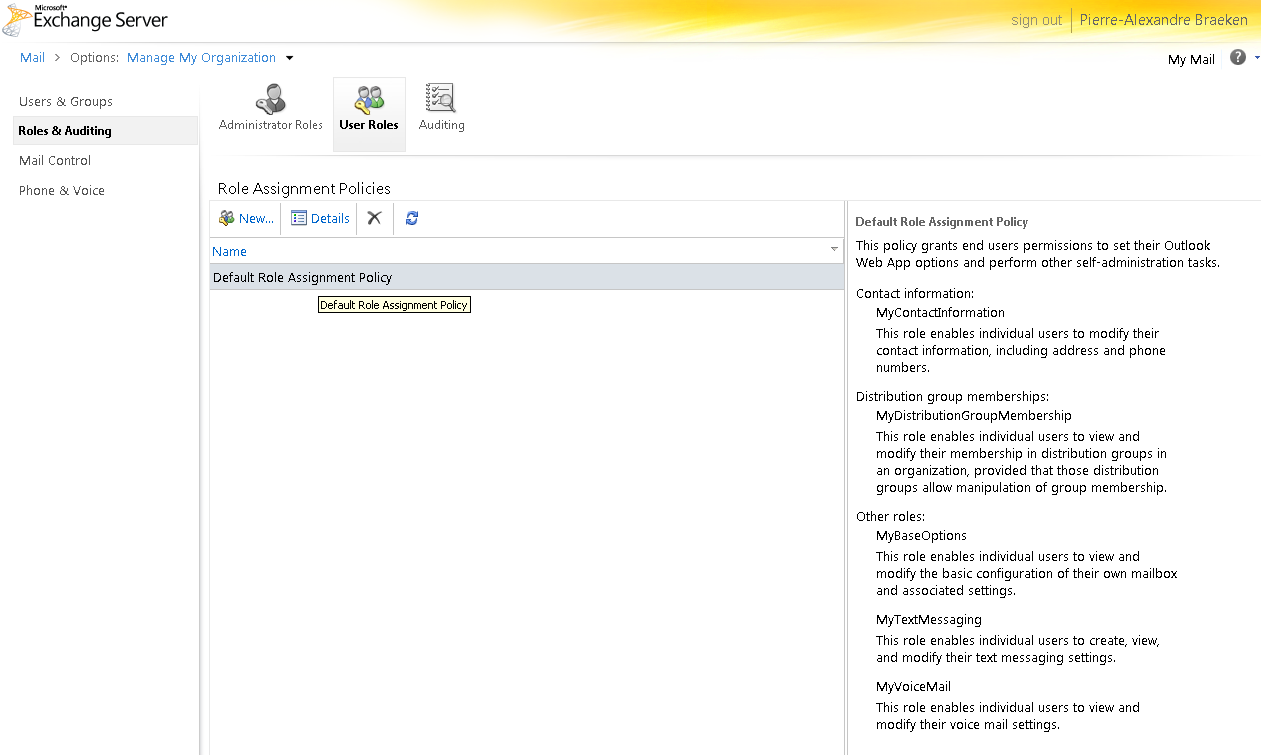


On tombe très rapidement sur ce rôle de gestion : MyDistributionGroups. Mais nous n'allons pas pouvoir l'utiliser. En effet, ce rôle permet à un utilisateur de créer et supprimer des listes de distribution. Ce rôle n'est donc pas assez restrictif puisque nous ne voulons permettre à notre utilisateur que l'ajout/suppression des membres de la liste de distribution.


3) Il nous faut créer notre propre rôle de gestion

Nous allons devoir créer notre propre rôle de gestion, et c'est ici qu'on va pouvoir apprécier la puissance du modèle de permissions RBAC d'Exchange 2010.

Let's Powershell !

Ouvrez une invite Exchange Management Shell.


New-ManagementRole -Name MyDistributionGroupsMembers -Parent MyDistributionGroups


Cette commande permet la création d'un rôle enfant du rôle vu précédemment. Nous devons donc logiquement retirer les possibilités de création/suppression d'une liste de distribution à ce nouveau rôle.

Vous pouvez également ajouter une description à votre nouveau rôle grâce au paramètre Description. La description devra être entourée de " ".


Powershell est à nouveau notre ami et nous entrons les deux commandes suivantes :


Remove-ManagementRoleEntry MyDistributionGroupsMembers\New-DistributionGroup -Confirm:$false


Remove-ManagementRoleEntry MyDistributionGroupsMembers\Remove-DistributionGroup -Confirm:$false


Nous sommes fin prêts désormais à assigner ce nouveau rôle que nous venons de créer à notre policy par défaut.

Nous avons encore besoin d'un peu de Powershell pour ceci :


New-ManagementRoleAssignment -Role MyDistributionGroupsMembers -Policy "Default Role Assignment Policy"


Si nous retournons à nouveau éditer notre policy "Default Role Assignement Policy", nous voyons que notre rôle a bien été ajouté comme enfant du rôle MyDistributionGroups.


Vos utilisateurs responsable de listes de distribution peuvent désormais ajouter/supprimer des membres des celles-c !

vendredi 11 janvier 2013

Exchange 2010 : 4.4.0 DNS Query failed

Notre serveur Exchange 2010 fonctionnait sans souci depuis près de deux ans, quand soudain, aujourd'hui un user rapporte un NDR de remise retardée.

En observant la queue du serveur en question, mon regard fut attiré par le code suivant :


451 4.4.0 DNS Query failed ?

Je fis donc une requête vers le domaine distant afin de m'assurer que celui-ci existait bien.

Aucun problème de ce côté là.

Un petit test smtp :


SMTP Reverse Banner Check OK - 64.46.34.16 resolves to mail.e-chl.com
SMTP Reverse DNS Mismatch OK - Reverse DNS matches SMTP Banner
SMTP TLS OK - Supports TLS.
SMTP Connection Time 0 seconds - Good on Connection time
SMTP Open Relay OK - Not an open relay.
SMTP Transaction Time 1.591 seconds - Good on Transaction Time

Pas de problème non plus ici.

Chez technet, deux solutions semblent envisagées concernant ce souci. Un ajout dans le host ou la suppression de la prise en charge ipv6.

J'ai testé la configuration par l'ajout domain name/ip dans le host, et là miracle les mails sont envoyés...

Je n'ai pas vu de patch concernant ce problème.

Trouvant cette solution peu élégante, voici donc la façon dont j'ai résolu la question :

1) Server Configuration > Hub Transport > Properties


2) External DNS Lookups > Use these DNS Servers 

3) Organization Configuration > Hub Transport > Send Connectors > YourConnector > Properties

4) Network > Use the External DNS Lookup settings ont the transport server

5) Services > restart the "Microsoft Exchange Transport" service


vendredi 7 décembre 2012

Exchange 2010: The Term “Search-Mailbox” Is Not Recognized as the Name of a cmdlet

Problem : Your goal is to search and delete a message from a mailbox on an exchange server 2010 You try this from Technet :
Search-Mailbox -Identity "April Stewart" -SearchQuery 'Subject:"Your bank statement"' -DeleteContent
But you get this error message :
The Term “Search-Mailbox” Is Not Recognized as the Name of a cmdlet
Solution : You have to register the Exchange Management Powershell Snapin
Add-PSSnapin Microsoft.Exchange.Management.PowerShell.E2010

lundi 11 avril 2011

Exchange 2010 : Offline address book --> 500 - Internal server error.

The error that I faced today was a problem about Offlin Address Book between Outlook 2010 and my Exchange Server 2010.

When i try to download OAB from Outlook 2010, The send/receive progress stay blocked on Processing.

I browse the internal address configure i had configure and i get a 500 internal error from the server.


The solution
I had to reset correct permissions on C:\Program Files\Microsoft\Exchange Server\V14\ClientAccess\OAB Folder and everithing came back to normal operation.

vendredi 8 avril 2011

Exchange 2010 SP1 rollup 3 won't install

If you've tried running on a Windows 2008 R2 the RU3 Microsoft Exchange 2010 SP1, you have probably encountered a installation problem.

To learn more you must enable a registry key that can generate installation logs. To do this edit the following registry key:

HKEY_LOCAL_MACHINE \ Software \ Policies \ Microsoft \ Windows \ Installer
REG_SZ: Logging
Value: voicewarmupx

Ps: if the folder "Install" does not exist create it.

Then restart the install process to diagnose the problem more advanced. If you look closely you should find the installation log very detailed the following exception:

CAQuietExec: You must have administrative credentials to perform this task. Contact your system administrator for assistance.

To complete the installation of this patch, open a command prompt as administrator and run the patch from the command line. The program will install properly.

Remove Public folders from old Exchange 2003 server after Exchange 2010 transition

If you can't remove public folder database on your old Exchange 2003 server (and after having replicate correctly data to Exchange 2010)

You can try this :

ADSI Edit >
Configuration
+ CN=Configuration
+ CN=Services
+ CN=Microsoft Exchange
+ CN=YOUR ORGANISATION
+ CN=Administrative Groups
+ CN=First Administrative Group
+ CN=Servers
+ CN=SERVER NAME
+ CN=InformationStore

Delete manually and dismounted the store.

You are able to uninstall Exchange 2003.

"The connection to the Microsoft Exchange Server is unavailable. Outlook must be online or connected to complete this action."

See kb : http://support.microsoft.com/kb/2299468/en-us

What i do :

New-ThrottlingPolicy –name Outlook2003Calendar

Set-ThrottlingPolicy –identity Outlook2003Calendar –RCAMaxConcurrency 100

Set-Mailbox –Identity “annoyed user” –ThrottlingPolicy Outlook2003Calendar

You can make a script to execute the third line for all your users.

How to centrally set the calendar access rights in Exchange 2010

If you want set default user permission to "Reviewer" for your entire organization, here it is a powershell script (replace italic word by your own configuration):

if (-not (Get-PSSnapin | Where-Object {$_.Name -like "Microsoft.Exchange.Management.PowerShell.E2010"})){
Add-PSSnapin Microsoft.Exchange.Management.PowerShell.E2010
}

$mailboxes = Get-Mailbox -Database "Mailbox Database"
$AccessRights = "Reviewer"

#Loop through all mailboxes
foreach ($mailbox in $mailboxes) {

#Retrieve name of the user`s calendar
$calendar = (($mailbox.SamAccountName)+ ":\" + (Get-MailboxFolderStatistics -Identity $mailbox.SamAccountName -FolderScope Calendar | Select-Object -First 1).Name)

#Check if calendar-permission for user "Default" is set to the default permission of "AvailabilityOnly"
if (((Get-MailboxFolderPermission $calendar | Where-Object {$_.User -like "Default"}).AccessRights) -like "AvailabilityOnly" ) {

Write-Host "Updating calendar permission for $mailbox...$calendar" -ForegroundColor Yellow

#Set calendar-permission for user "Default" to value defined in variable $AccessRights
Set-MailboxFolderPermission -User "Default" -AccessRights $AccessRights -Identity $calendar

}
}

PS: You need SP1 to do that

Action 'Update' could not be performed on object 'Default Offline Address List'.

To fix this:

a) Open Adsiedit.msc
b) Browse to Configuration, Services, Microsoft Exchange, , Address List Container, Offline Address Lists
c) Open properties of the Default Offline Address List on the right
d) Change siteFolderServer attribute to the DN of the correct Public Folder e.g.

CN=Public Folder Database,CN=Databases,CN=Exchange Administrative Group (FYDIBOHF23SPDLT),CN=Administrative Groups,CN=MAIL,CN=Microsoft Exchange,CN=Services,CN=Configuration,DC=CONTOSO,DC=com

jeudi 24 mars 2011

Event ID 9360 Offline Address book doesn't update

The problem

OABGen encountered an error while generating the changes.oab file for version 2 and 3 differential downloads of address list '\Global Address List'. The offline address book has not been updated so clients will not be able to download the current set of changes. Check other logged events to find the cause of this error.


On the Exchange server, start Regedit.exe.
Open the following registry key:
HKEY_LOCAL_MACHINE\System\CurrentControlSet\Services\MSExchangeSA\Parameters
Right-click Parameters, point to New, and then click DWORD Value.
For the new value name, type OAL post full if diff fails.
Double-click OAL post full if diff fails. In Value data, type 1. Click OK.
Close Regedit.exe.

Microsoft Exchange > Organisation Configuration > Mailbox > Offline Address Book > Right click on Default Offline Address List > Update

Then in Outlook,download address book.

lundi 21 mars 2011

Exchange 2010: 0x8004010F public folder doesn't synchronize

In an Exchange 2010 environment in cohabitation mode with Exchange 2003, you get the error with Outlook 2003 clients "0x8004010F Does not synchronize public folder".

Remove the mail profiles, add again and check the box Encrypt data between Microsoft Office Outlook and Microsoft Exchange Server (you can do it manually or via .prf files)

dimanche 20 mars 2011

Echange 2010 : Set-ReceiveConnector Failed

You try to set the FQDN on your DEFAULT* receive connector and you encounter this problem :

--------------------------------------------------------
Microsoft Exchange Error
--------------------------------------------------------
The following error(s) occurred while saving changes:

Set-ReceiveConnector
Failed
Error:
If the AuthMechanism attribute on a receive connector contains the value ExchangeServer, you must set the FQDN parameter on the receive connector to one of the following values: the FQDN of the transport server "exchange box.*************.***", the NetBIOS name of the transport server "exchange box", or $null.


You have to check Anonymous Users, click OK to return to the console then restart the Microsoft exchange Transport service then apply the FQDN Change.


* The one that starts with DEFAULT is your Internet Connector, this receives e-mail from the outside world

samedi 19 mars 2011

Exchange 2010 : Enable Resource Booking Attendant (in place of auto accept agent)

In a previous article I explained how to install and configure the auto accept agent (for exchange 2003)

Now, you have migrated your users from 2003 to Exchange 2010.

Some of your users was configured with Auto Accept Agent.

You want those users do the same they do in Exchange 2003.

1) Set the attribute IsResource for these users

In Exchange Management Shell, type:

Get-Mailbox -Identity YourMailBox | ft Name, IsResource

If result in IsResource will be FALSE then convert this mailbox with second command:

Set-Mailbox -Identity YourMailBox-Type Room

2) Activate the Resource Booking Attendant on the MailBox

In Exchange Management Console > Recipient Configuration > Mailbox > Properties

You can see now new Resource tabs have appeared.

Hit on Resource General and check "Enable the Resource Booking Attendant..."


Hit on Resource Information Tab and configure as you want.

Echange 2010 : Insufficient access rights to perform the operation (mailbox moving operation)

I came across an error today when trying to move a mailbox from Exchange 2003 onto Exchange 2010.

Error:
Active Directory operation failed on Domain Controler. This error is not retriable. Additional information: Insufficient access rights to perform the operation.
Active directory response: 00002098: SecErr: DSID-03150BB9, problem 4003 (INSUFF_ACCESS_RIGHTS), data 0

a) Cancel the move request

You can examine this move request by running 'Get-MoveRequestStatistics -MoveRequestQueue 'YourExchangeMailboxDatabase' -MailboxGuid MailboxGuidOfTheAccount -IncludeReport | fl'.

You can remove it by running 'Remove-MoveRequest -MoveRequestQueue 'YourExchangeMailboxDatabase' -MailboxGuid MailboxGuidOfTheAccount'.

b) Give correct rights to the user account

1. Open ADUC (with advanced features view)

2. user account > properties > security tab > advanced

3. Check the box "include inheritable permission" and apply.

4. Launch replication between your DC

c) Move the Mailbox

mercredi 16 mars 2011

Access to the path ExchangeSetup\LPVersioning.xml is denied

If you encounter the message "Access to the path ExchangeSetup\LPVersioning.xml is denied" when installing Exchange 2010, it is possible that you try to do it via a copy of the installation DVD in a share or locally on the server (in the case of a virtual machine for example).

In this case, the solution is to rip the DVD and make an ISO.

Then mount the iso in the VM and restart the installation process

mercredi 2 février 2011

Auto Accept Agent Installation and configuration - Meeting Room auto accept or deny scheduling

Goal : Manage auto accept request for meeting room  in Outlook.

First of all, you have to create a resource for the meeting room. So create a normal user with an email (by example : meetingroom1@test.com).

Download the tool AutoAccept.EXE (Resource kit Exchange Server 2003)

http://www.microsoft.com/downloads/en/details.aspx?familyid=3d0884e6-c603-491d-bf57-acf03e046bfe&displaylang=en

To Install Auto Accept Agent
1. On the download page at http://go.microsoft.com/fwlink/?linkid=28650, double-click Download to open the Windows Installer Package (AUTOACCEPT.MSI). Follow the instructions on the screen.
2. In the Auto Accept Agent Installation Wizard, click Next on the Welcome page.
3. On the End User License page, read the license agreement. If you agree to the terms, click I agree and then click Next.
4. The default directory in which Auto Accept Agent installs is \Exchsrvr\Agents\AutoAccept. You can change this default. Click Next. Auto Accept Agent installs.
5. Select Run as Local System (available only if you are running Microsoft Windows Server 2003) or This user. If you select This user, specify the credentials for Auto Accept Agent by providing the username under which Auto Accept Agent will run, the password for this account, and the domain for this account. Click OK.

Edit C:\Program Files\Exchsrvr\Agents\AutoAccept\AutoAccept.config.xml

<?xml version="1.0" encoding="utf-8" ?>
- <Configuration xmlns:xsd="http://www.w3.org/2001/XMLSchema" xmlns:xsi="http://www.w3.org/2001/XMLSchema-instance" xmlns="urn:microsoft.exchange.agents.autoaccept.config" xsi:schemaLocation="urn:microsoft.exchange.agents.autoaccept.config AutoAccept.config.xsd">
- <GlobalSettings>
  <BookingWindowInMonths>12</BookingWindowInMonths>
  <DeleteAttachments>true</DeleteAttachments>
  <DeleteComments>true</DeleteComments>
  <DeleteNonCalendarItems>true</DeleteNonCalendarItems>
  <DisableReminders>true</DisableReminders>
  <EnforceRecurringMeetingEndDate>true</EnforceRecurringMeetingEndDate>
  <RecurringMeetingConflictPercentageAllowed>0</RecurringMeetingConflictPercentageAllowed>
  <RecurringMeetingMaximumConflictInstances>0</RecurringMeetingMaximumConflictInstances>
  <RemovePrivateProperty>true</RemovePrivateProperty>
  <TraceLevel>0</TraceLevel>
  <TraceListenerFile>c:\temp\log.txt</TraceListenerFile>
  <TraceToEventLog>false</TraceToEventLog>
  <EnableResponseDetails>true</EnableResponseDetails>
  <IncludeDebugInResponse>true</IncludeDebugInResponse>
  <CustomResponseText />
  </GlobalSettings>
- <Mailbox EMailAddress="meetingroom1@test.com">
- <Settings>
  <BookingWindowInMonths>12</BookingWindowInMonths>
  <DeleteAttachments>true</DeleteAttachments>
  <DeleteNonCalendarItems>true</DeleteNonCalendarItems>
  <DisableReminders>true</DisableReminders>
  <RecurringMeetingConflictPercentageAllowed>25</RecurringMeetingConflictPercentageAllowed>
  <RecurringMeetingMaximumConflictInstances>4</RecurringMeetingMaximumConflictInstances>
  <TraceLevel>0</TraceLevel>
  </Settings>
  </Mailbox>
- <Mailbox EMailAddress="meetingroom2@test.com">
- <Settings>
  <BookingWindowInMonths>12</BookingWindowInMonths>
  <DeleteAttachments>true</DeleteAttachments>
  <DeleteNonCalendarItems>true</DeleteNonCalendarItems>
  <DisableReminders>true</DisableReminders>
  <RecurringMeetingConflictPercentageAllowed>25</RecurringMeetingConflictPercentageAllowed>
  <RecurringMeetingMaximumConflictInstances>4</RecurringMeetingMaximumConflictInstances>
  <TraceLevel>0</TraceLevel>
  </Settings>
  </Mailbox>
  </Configuration>


Restart service


Create a file.txt with emails you want to add
meetingroom1@test.com

meetingroom2@test.com

Then in a command shell
cscript RegisterMailbox.vbs /f:file.txt /t:domain\username