vendredi 6 mai 2011

SQL Server : Shrink failed for Database ‘Data base name’.

You try to shrink a database and you get the following error

TITLE: Microsoft SQL Server Management Studio
——————————
Shrink failed for Database ‘Data base name’. (Microsoft.SqlServer.Smo)
For help, click: http://go.microsoft.com/fwlink?ProdName=Microsoft+SQL+Server&ProdVer=9.00.1399.00&EvtSrc=Microsoft.SqlServer.Management.Smo.ExceptionTemplates.FailedOperationExceptionText&EvtID=Shrink+Database&LinkId=20476
——————————
ADDITIONAL INFORMATION:
An exception occurred while executing a Transact-SQL statement or batch. (Microsoft.SqlServer.ConnectionInfo)
——————————
A severe error occurred on the current command. The results, if any, should be discarded. (Microsoft SQL Server, Error: 0)
For help, click: http://go.microsoft.com/fwlink?ProdName=Microsoft+SQL+Server&ProdVer=09.00.1399&EvtSrc=MSSQLServer&EvtID=0&LinkId=20476

The problem is that there is not enough disk space to shrink your database.

Free up disk space on the partition where the database is and that should work !

lundi 11 avril 2011

Exchange 2010 : Offline address book --> 500 - Internal server error.

The error that I faced today was a problem about Offlin Address Book between Outlook 2010 and my Exchange Server 2010.

When i try to download OAB from Outlook 2010, The send/receive progress stay blocked on Processing.

I browse the internal address configure i had configure and i get a 500 internal error from the server.


The solution
I had to reset correct permissions on C:\Program Files\Microsoft\Exchange Server\V14\ClientAccess\OAB Folder and everithing came back to normal operation.

Backup Exec 2010 crash after UPDATES

I've encoutendred today a problem with Backup Exec 2010 after applied updates (HotFix 144101, 148347, 15309, 147674)

These errors were present In Windows application event log :

Event ID 58368 : Port 3527 must be available for the central administration server to communicate with the managed media server.

Event ID 57802 : The Backup Exec Server Service did not start. An internal error (-22) occurred in object 11.


This bug was referenced by Symantec : http://www.symantec.com/business/support/index?page=content&id=TECH68932

So, as they say : Open task manager and locate the LUGETUPDATES.exe process. If LUGETUPDATES.exe is present and running, end the process.

vendredi 8 avril 2011

Exchange 2010 SP1 rollup 3 won't install

If you've tried running on a Windows 2008 R2 the RU3 Microsoft Exchange 2010 SP1, you have probably encountered a installation problem.

To learn more you must enable a registry key that can generate installation logs. To do this edit the following registry key:

HKEY_LOCAL_MACHINE \ Software \ Policies \ Microsoft \ Windows \ Installer
REG_SZ: Logging
Value: voicewarmupx

Ps: if the folder "Install" does not exist create it.

Then restart the install process to diagnose the problem more advanced. If you look closely you should find the installation log very detailed the following exception:

CAQuietExec: You must have administrative credentials to perform this task. Contact your system administrator for assistance.

To complete the installation of this patch, open a command prompt as administrator and run the patch from the command line. The program will install properly.

Remove Public folders from old Exchange 2003 server after Exchange 2010 transition

If you can't remove public folder database on your old Exchange 2003 server (and after having replicate correctly data to Exchange 2010)

You can try this :

ADSI Edit >
Configuration
+ CN=Configuration
+ CN=Services
+ CN=Microsoft Exchange
+ CN=YOUR ORGANISATION
+ CN=Administrative Groups
+ CN=First Administrative Group
+ CN=Servers
+ CN=SERVER NAME
+ CN=InformationStore

Delete manually and dismounted the store.

You are able to uninstall Exchange 2003.

"The connection to the Microsoft Exchange Server is unavailable. Outlook must be online or connected to complete this action."

See kb : http://support.microsoft.com/kb/2299468/en-us

What i do :

New-ThrottlingPolicy –name Outlook2003Calendar

Set-ThrottlingPolicy –identity Outlook2003Calendar –RCAMaxConcurrency 100

Set-Mailbox –Identity “annoyed user” –ThrottlingPolicy Outlook2003Calendar

You can make a script to execute the third line for all your users.

How to centrally set the calendar access rights in Exchange 2010

If you want set default user permission to "Reviewer" for your entire organization, here it is a powershell script (replace italic word by your own configuration):

if (-not (Get-PSSnapin | Where-Object {$_.Name -like "Microsoft.Exchange.Management.PowerShell.E2010"})){
Add-PSSnapin Microsoft.Exchange.Management.PowerShell.E2010
}

$mailboxes = Get-Mailbox -Database "Mailbox Database"
$AccessRights = "Reviewer"

#Loop through all mailboxes
foreach ($mailbox in $mailboxes) {

#Retrieve name of the user`s calendar
$calendar = (($mailbox.SamAccountName)+ ":\" + (Get-MailboxFolderStatistics -Identity $mailbox.SamAccountName -FolderScope Calendar | Select-Object -First 1).Name)

#Check if calendar-permission for user "Default" is set to the default permission of "AvailabilityOnly"
if (((Get-MailboxFolderPermission $calendar | Where-Object {$_.User -like "Default"}).AccessRights) -like "AvailabilityOnly" ) {

Write-Host "Updating calendar permission for $mailbox...$calendar" -ForegroundColor Yellow

#Set calendar-permission for user "Default" to value defined in variable $AccessRights
Set-MailboxFolderPermission -User "Default" -AccessRights $AccessRights -Identity $calendar

}
}

PS: You need SP1 to do that

Action 'Update' could not be performed on object 'Default Offline Address List'.

To fix this:

a) Open Adsiedit.msc
b) Browse to Configuration, Services, Microsoft Exchange, , Address List Container, Offline Address Lists
c) Open properties of the Default Offline Address List on the right
d) Change siteFolderServer attribute to the DN of the correct Public Folder e.g.

CN=Public Folder Database,CN=Databases,CN=Exchange Administrative Group (FYDIBOHF23SPDLT),CN=Administrative Groups,CN=MAIL,CN=Microsoft Exchange,CN=Services,CN=Configuration,DC=CONTOSO,DC=com

vendredi 1 avril 2011

Outlook 2003 in Exchange 2010 environment : Configure Encryption with PRF files

1) Add in [Exchange Global Section]

RPCEncryptData = PT_LONG, 0x6606

2) Add in [ServiceEGS]

RPCEncryptData = 0x00004100

jeudi 24 mars 2011

Outlook : Installed add-in is not visible in Microsoft Outlook

You installed an add-in in Outlook and it is not visible.

The solution is to delete the user's profile to verify if it is not present in disabled items.

How To

Exit Outlook > C:\Document and Settings\"username"\Local settings\Application data\Microsoft\Outlook > delete extend.dat

Outlook 2003

Start Outlook > Help > About Microsoft Office Outlook > Click Disabled Items

If the add-in is included in the list, choose it and click Enable.

Restart Outlook.

Outlook 2007

Start Outlook > Tools > Trust Center > Add-ins tab > Manage dropdown menu > Disabled Items > Go

If the add-in is included in the list, choose it and click Enable.

Restart Outlook.

Event ID 9360 Offline Address book doesn't update

The problem

OABGen encountered an error while generating the changes.oab file for version 2 and 3 differential downloads of address list '\Global Address List'. The offline address book has not been updated so clients will not be able to download the current set of changes. Check other logged events to find the cause of this error.


On the Exchange server, start Regedit.exe.
Open the following registry key:
HKEY_LOCAL_MACHINE\System\CurrentControlSet\Services\MSExchangeSA\Parameters
Right-click Parameters, point to New, and then click DWORD Value.
For the new value name, type OAL post full if diff fails.
Double-click OAL post full if diff fails. In Value data, type 1. Click OK.
Close Regedit.exe.

Microsoft Exchange > Organisation Configuration > Mailbox > Offline Address Book > Right click on Default Offline Address List > Update

Then in Outlook,download address book.

lundi 21 mars 2011

Exchange 2010: 0x8004010F public folder doesn't synchronize

In an Exchange 2010 environment in cohabitation mode with Exchange 2003, you get the error with Outlook 2003 clients "0x8004010F Does not synchronize public folder".

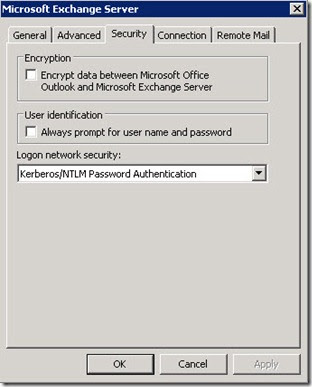
Remove the mail profiles, add again and check the box Encrypt data between Microsoft Office Outlook and Microsoft Exchange Server (you can do it manually or via .prf files)

dimanche 20 mars 2011

Echange 2010 : Set-ReceiveConnector Failed

You try to set the FQDN on your DEFAULT* receive connector and you encounter this problem :

--------------------------------------------------------
Microsoft Exchange Error
--------------------------------------------------------
The following error(s) occurred while saving changes:

Set-ReceiveConnector
Failed
Error:
If the AuthMechanism attribute on a receive connector contains the value ExchangeServer, you must set the FQDN parameter on the receive connector to one of the following values: the FQDN of the transport server "exchange box.*************.***", the NetBIOS name of the transport server "exchange box", or $null.


You have to check Anonymous Users, click OK to return to the console then restart the Microsoft exchange Transport service then apply the FQDN Change.


* The one that starts with DEFAULT is your Internet Connector, this receives e-mail from the outside world

samedi 19 mars 2011

Exchange 2010 : Enable Resource Booking Attendant (in place of auto accept agent)

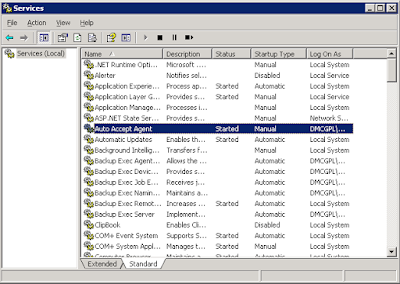
In a previous article I explained how to install and configure the auto accept agent (for exchange 2003)

Now, you have migrated your users from 2003 to Exchange 2010.

Some of your users was configured with Auto Accept Agent.

You want those users do the same they do in Exchange 2003.

1) Set the attribute IsResource for these users

In Exchange Management Shell, type:

Get-Mailbox -Identity YourMailBox | ft Name, IsResource

If result in IsResource will be FALSE then convert this mailbox with second command:

Set-Mailbox -Identity YourMailBox-Type Room

2) Activate the Resource Booking Attendant on the MailBox

In Exchange Management Console > Recipient Configuration > Mailbox > Properties

You can see now new Resource tabs have appeared.

Hit on Resource General and check "Enable the Resource Booking Attendant..."


Hit on Resource Information Tab and configure as you want.

Echange 2010 : Insufficient access rights to perform the operation (mailbox moving operation)

I came across an error today when trying to move a mailbox from Exchange 2003 onto Exchange 2010.

Error:
Active Directory operation failed on Domain Controler. This error is not retriable. Additional information: Insufficient access rights to perform the operation.
Active directory response: 00002098: SecErr: DSID-03150BB9, problem 4003 (INSUFF_ACCESS_RIGHTS), data 0

a) Cancel the move request

You can examine this move request by running 'Get-MoveRequestStatistics -MoveRequestQueue 'YourExchangeMailboxDatabase' -MailboxGuid MailboxGuidOfTheAccount -IncludeReport | fl'.

You can remove it by running 'Remove-MoveRequest -MoveRequestQueue 'YourExchangeMailboxDatabase' -MailboxGuid MailboxGuidOfTheAccount'.

b) Give correct rights to the user account

1. Open ADUC (with advanced features view)

2. user account > properties > security tab > advanced

3. Check the box "include inheritable permission" and apply.

4. Launch replication between your DC

c) Move the Mailbox

mercredi 16 mars 2011

Access to the path ExchangeSetup\LPVersioning.xml is denied

If you encounter the message "Access to the path ExchangeSetup\LPVersioning.xml is denied" when installing Exchange 2010, it is possible that you try to do it via a copy of the installation DVD in a share or locally on the server (in the case of a virtual machine for example).

In this case, the solution is to rip the DVD and make an ISO.

Then mount the iso in the VM and restart the installation process

mercredi 9 mars 2011

Time configuration in a Windows Domain

Let’s go on with some configurations on Windows Server 2003 or higher OS:

- to configure the Domain Controller with the PDC Emulator FSMO to another time source, run:

w32tm /config /manualpeerlist:PEERS /syncfromflags:manual /reliable:yes /update
w32tm /resync /rediscover

Please set for PEERS the time source as listed above, either with it’s ip address or DNS name. If more then one is needed separate them with a space in between and don't forget the quotes: "time.domain.com time1.domain.com"

Internet Time servers you can find here: http://www.pool.ntp.org/

-->w32tm /config /manualpeerlist:"0.pool.ntp.org 1.pool.ntp.org 2.pool.ntp.org" /syncfromflags:manual /reliable:yes /update


- to configure a domain computer for automatic domain time synchronization, run:

w32tm /config /syncfromflags:domhier /update

After that you have to run:
net stop w32time
net start w32time


- to reconfigure the previous PDC Emulator, in case of transferring/seizing the FSMO to another Domain Controller, run:


w32tm /config /syncfromflags:domhier /reliable:no /update

After that you have to run:
net stop w32time
net start w32time


If you have to reconfigure a Windows 2000 Server Domain Controller, the steps are different after transferring/seizing the PDC Emulator role to another Domain Controller:

- you have to modify the "Type" value to "Nt5Ds" without the quotes under this registry key:

HKLM\ SYSTEM\ CurrentControlSet\ Services\ W32Time\ Parameters\

------------------------------------------------------------------
If you have problems with the time service configuration, because too many changes where done in the registry or you like start fresh on a computer, then you can reset the time service to a default state the following way. Make sure to use an elevated command prompt, to have full administrative permissions. Then type in the following commands:

net stop w32time

w32tm /unregister

w32tm /register

net start w32time

mardi 1 mars 2011

Windows Update Error (Code 80070005) on Windows 2008 R2 Domain Controller

Fresh Server 2008 R2 OS install, windows updates worked fine, promoted to a DC and then windows update failed with Code Error 80070005.

The solution that worked there -->

Remove the domain admin user from the domain guest group
Force replication between your DC
Logoff, logon
Launch Windows Update

vendredi 11 février 2011

ESX VSPhere - Migrate VM from Local Storage to SAN without VCenter

1) Create volume on SAN

2) Follow these high-level steps to move a virtual machine to an alternate location (http://kb.vmware.com/selfservice/microsites/search.do?language=en_US&cmd=displayKC&externalId=1000936):

1.Select the virtual machine.
2.Commit all snapshots on the virtual machine. For more information, see Committing snapshots from within the Service Console (1006847).
3.Identify the working directory of the virtual machine.
4.Identify the location of all virtual disks.
5.Power off the virtual machine.
6.Create a folder for the copy of the virtual machine.
7.Copy the virtual machine configuration file (.vmx) to the new folder.
8.Copy the virtual disks to the new folder. For more information, see Moving or Copying Virtual Disks in a VMware Environment (900).
9.Register the new virtual machine.
10.Add the virtual disk copies to the virtual machine copy.
11.Upgrade the virtual hardware if necessary.
12.Power on the virtual machine.
13.Test the new virtual machine.
14.Optionally, delete the original virtual machine files.


Identifying the working directory
vmware-cmd -l

--> /vmfs/volumes/49bf8b5c-63674280-c015-00215xxxxx/VM_Local/VMx_Local.vmx

Identifying the location of all virtual disks
grep -i vmdk /vmfs/volumes/49bf8b5c-63674280-c015-00215xxxxx/VM_Local/VMx_Local.vmx

--> scsi0:0.fileName = "VM_Local.vmdk"

Creating a folder for the copy of the virtual machine
cd /vmfs/volumes/VM_DISK_C
mkdir VM_SAN

Clone VM
vmkfstools -i /vmfs/volumes/49bf8b5c-63674280-c015-00215xxxxx/VM_Local/IMCAS16_Local.vmdk /vmfs/volumes/VM_C/VM_SAN/VM_SAN.vmdk

Copying the virtual machine configuration file to the new folder
cp /vmfs/volumes/49bf8b5c-63674280-c015-00215xxxxx/VM_Local/VM_Local.vmx /vmfs/volumes/VM_DISK_C/VM_SAN/VM_SAN.vmx

Registering a virtual machine
To register a virtual machine from the ESX Service Console, run the command:

vmware-cmd /vmfs/volumes/4d54fe27-a09c1aa5-80a3-00215xxxxx/VM_SAN/VM_SAN.vmx register

Problem parsing database at line 875 - clamav ERROR: Malformed database on Ubuntu distribution

The problem

"Problem parsing database at line 875 "

"clamav ERROR: Malformed database"

And your clamav-daemon not started

The solution

--> Verify your distribution is up to date

sudo aptitude update
sudo aptitude safe-upgrade
sudo rm /var/lib/clamav/daily.cld
sudo freshclam
sudo /etc/init.d/clamav-daemon start

mercredi 2 février 2011

Auto Accept Agent Installation and configuration - Meeting Room auto accept or deny scheduling

Goal : Manage auto accept request for meeting room  in Outlook.

First of all, you have to create a resource for the meeting room. So create a normal user with an email (by example : meetingroom1@test.com).

Download the tool AutoAccept.EXE (Resource kit Exchange Server 2003)

http://www.microsoft.com/downloads/en/details.aspx?familyid=3d0884e6-c603-491d-bf57-acf03e046bfe&displaylang=en

To Install Auto Accept Agent
1. On the download page at http://go.microsoft.com/fwlink/?linkid=28650, double-click Download to open the Windows Installer Package (AUTOACCEPT.MSI). Follow the instructions on the screen.
2. In the Auto Accept Agent Installation Wizard, click Next on the Welcome page.
3. On the End User License page, read the license agreement. If you agree to the terms, click I agree and then click Next.
4. The default directory in which Auto Accept Agent installs is \Exchsrvr\Agents\AutoAccept. You can change this default. Click Next. Auto Accept Agent installs.
5. Select Run as Local System (available only if you are running Microsoft Windows Server 2003) or This user. If you select This user, specify the credentials for Auto Accept Agent by providing the username under which Auto Accept Agent will run, the password for this account, and the domain for this account. Click OK.

Edit C:\Program Files\Exchsrvr\Agents\AutoAccept\AutoAccept.config.xml

<?xml version="1.0" encoding="utf-8" ?>
- <Configuration xmlns:xsd="http://www.w3.org/2001/XMLSchema" xmlns:xsi="http://www.w3.org/2001/XMLSchema-instance" xmlns="urn:microsoft.exchange.agents.autoaccept.config" xsi:schemaLocation="urn:microsoft.exchange.agents.autoaccept.config AutoAccept.config.xsd">
- <GlobalSettings>
  <BookingWindowInMonths>12</BookingWindowInMonths>
  <DeleteAttachments>true</DeleteAttachments>
  <DeleteComments>true</DeleteComments>
  <DeleteNonCalendarItems>true</DeleteNonCalendarItems>
  <DisableReminders>true</DisableReminders>
  <EnforceRecurringMeetingEndDate>true</EnforceRecurringMeetingEndDate>
  <RecurringMeetingConflictPercentageAllowed>0</RecurringMeetingConflictPercentageAllowed>
  <RecurringMeetingMaximumConflictInstances>0</RecurringMeetingMaximumConflictInstances>
  <RemovePrivateProperty>true</RemovePrivateProperty>
  <TraceLevel>0</TraceLevel>
  <TraceListenerFile>c:\temp\log.txt</TraceListenerFile>
  <TraceToEventLog>false</TraceToEventLog>
  <EnableResponseDetails>true</EnableResponseDetails>
  <IncludeDebugInResponse>true</IncludeDebugInResponse>
  <CustomResponseText />
  </GlobalSettings>
- <Mailbox EMailAddress="meetingroom1@test.com">
- <Settings>
  <BookingWindowInMonths>12</BookingWindowInMonths>
  <DeleteAttachments>true</DeleteAttachments>
  <DeleteNonCalendarItems>true</DeleteNonCalendarItems>
  <DisableReminders>true</DisableReminders>
  <RecurringMeetingConflictPercentageAllowed>25</RecurringMeetingConflictPercentageAllowed>
  <RecurringMeetingMaximumConflictInstances>4</RecurringMeetingMaximumConflictInstances>
  <TraceLevel>0</TraceLevel>
  </Settings>
  </Mailbox>
- <Mailbox EMailAddress="meetingroom2@test.com">
- <Settings>
  <BookingWindowInMonths>12</BookingWindowInMonths>
  <DeleteAttachments>true</DeleteAttachments>
  <DeleteNonCalendarItems>true</DeleteNonCalendarItems>
  <DisableReminders>true</DisableReminders>
  <RecurringMeetingConflictPercentageAllowed>25</RecurringMeetingConflictPercentageAllowed>
  <RecurringMeetingMaximumConflictInstances>4</RecurringMeetingMaximumConflictInstances>
  <TraceLevel>0</TraceLevel>
  </Settings>
  </Mailbox>
  </Configuration>


Restart service


Create a file.txt with emails you want to add
meetingroom1@test.com

meetingroom2@test.com

Then in a command shell
cscript RegisterMailbox.vbs /f:file.txt /t:domain\username

lundi 31 janvier 2011

PowerShell Find and Delete Old Computer Accounts - Clean Active Directory

PowerShell find all the inactive computer accounts in the domain.

You can do this by this simple line as long as you have the Quest AD Cmdlets installed.

get-qadcomputer -IncludeAllProperties | Where-Object { $_.lastlogon -lt (get-date).AddDays(-90) }

Quest AD Cmdlets are free to download from http://www.quest.com/powershell/activeroles-server.aspx

vendredi 14 janvier 2011

Retrieve Contacts Address Book - Outlook Cached Exchange Mode - Outlook 2010

You have changed your PC and you want to retrieve your personal contacts in Outlook.

If you use the Cached Exchange Mode in outlook here's how to do :

Click on Tools>Select E-mail Accounts Microsoft Exchange Server>Change>Check the option "Use Cached Exchange Mode"

The proccess will create the .ost files with all your contacts in C:\Documents and Settings\\Local Settings\Application Data\Microsoft\Outlook\outlook.ost

And then (http://support.microsoft.com/kb/197577)

Add the Outlook Address Book service to your profile
To add the Outlook Address Book Service to your profile in Outlook 2007, follow these steps:

1. If Outlook is running, click the File menu, and then click Exit to close Outlook.
2. Click Start, click Control Panel, click User Accounts, and then click Mail.
3. In the Mail Setup-Outlook dialog box, click E-mail Accounts.
4. In the Account Settings dialog box, click New.
5. If you see the Add New Email account-Choose E-mail Service dialog box, click the Microsoft Exchange, POP3, IMAP, or HTTP option, and then click Next.

If you see the Add New Email account-Auto Account Setup dialog box, proceed to the next step.
6. In the Add New Email account-Auto Account Setup dialog box, type your name, e-mail address, and password, and then click Next.
7. When you see the congratulations screen, click Finish.
8. Start Outlook.

To add the Outlook Address Book Service to your profile in earlier versions of Outlook, follow these steps:

1. Start Outlook.
2. On the Tools menu, click Services.
3. Confirm that the Outlook Address Book service is in the list of services. If it is not listed, click Add.
4. In the Available Information Services list, click to select the Outlook Address Book, and then click OK three times to close all dialog boxes.
5. On the File menu, click Exit and Log Off.
6. Restart Outlook using the same profile.
7. Right-click the Contacts folder, and then click Properties.
8. Click the Outlook Address Book tab to verify that the Show this folder as an e-mail Address Book check box is selected.

Ubuntu - "is not a valid block device"

You try to mount a network share and you get the error:

mount: //xxx.xxx.xxx.xxx/shared/ is not a valid block device

--> Install smbfs

# aptitude update
# aptitude install smbfs